Home * Patterns * Tutorials * Made It * Our Story

Monday, January 31, 2011

I'm a contestant on American Crafters!! :)

This morning when I was checking my email I received an exciting surprise! :) Amy from Nap Time Crafters had sent me an email letting me know that I was picked to be one of the 15 contestants for the American Crafters Contest! Yippy! :) How exciting!


There will be a few different rounds, where the judges are YOU! There are judges who will add commentary on each entry, but ultimately, the readers are the ones who pick their favorites. Each week you will pick your favorite three projects and then I'm not sure how many will continue on to the next round. Anyway... This weeks theme is:


Oh, I am racking my brain. What to do?!

I have to submit my project by Thursday, and then all the projects will be posted on Friday and voting continues until Sunday. So PLEASE be sure to stop by and vote for your favorites!!! :) (and it's ok if you don't necessarily vote for mine. Just whoever's is the best.) :)


I will post my project on my blog too, so be sure to check back and see how it goes. :) Thanks Amy! :)

Made It: Baby Quilts

This is the first quilt I ever made:


It's Hunter's baby quilt. I started it about 5 months before Hunter was born. My wonderful quilter step-mom helped me out. I remember being at the checkout at Joann's buying the fabric and commenting on how I hoped I would finish it before he was born. lol. My step-mom AND the cashier looked at me like, "Are you serious?! You have 5 months. of course you'll finish it." Little did they know, I didn't finish it until he was 1 (I think I finished the binding a week after his birthday). :) Oh well. :) It was quite the experience of re-sewing and sitting, and ug moments. :) But it's finished and we like it. Though doing it again, I would have picked totally different colors. Oh well. I did want it to kind of go with the baby book I picked for him: Guess How Much I Love You, so the colors do fit, and I do love that book. :)

Guess How Much I Love You


For Jackson's baby quilt I knew I wanted to use brighter colors, like in the book the Very Hungry Caterpillar.
Very Hungry Caterpillar
I went with a MUCH simpler pattern and this was definitely a LOT quicker to make! :) Thanks to Crazy Mom Quilts, the binding turned out a lot better too. :) Fun.


I love the quilting on both of them!! :) They each have their names, birthdate, birth place and {heart} Mom and Dad around the edges.


I "knew" I was going to have a little girl, so quite a while ago I bought this stack of Nicey Jane fabric. I LOVE it!!!!!!


I can't wait to get started, but I have NO IDEA what pattern to use. I actually do REALLY like this quilt that is in this banner picture, but I don't know if I can see enough of it to figure it out. I did make up a pattern based on what I think it is, but I'm a little nervous to get started incase I don't end up liking how I figured it out.

This is from The Gracie Jane Project blog. You SERIOUSLY have to check it out. The whole idea of it is to make super cute baby quilts for babies in the NICU. Sometimes I wonder what I'm ever going to do with all the fabric that I have, and if nothing else, I want to do this! (p.s. Isn't that such a cute little baby?!)

If you have ANY idea how this pattern goes, will you help me out??? I will love you forever! :)

I really do love quilts, and quilting, though it makes me SO want a super nice quilting machine - which I do NOT have. One day. :)

I'm linking up! So check out the wonderful daily linky party links on my side bar ----->

Friday, January 28, 2011

Made It: Learning Numbers

Sometimes I really want to be able to sit down and learn with Hunter. But then I think of all the supplies I need. :) He's been doing really well saying all his numbers lately, but doesn't quite have them in order, or recognize which is what (except 2. He knows that one.) Remember, he's only 2 1/2. I hope he's not behind. ;) Anyway, I finally decided to hurry and do a quick nap time craft and make him some extra large felt numbers so that we could have some good visuals (and not waste a ton of paper all the time). :)

haha. Did you notice that my 9 is backwards in this picture. I did realize it afterwards. :)

He seems to love them!


Here's how I made them (they did take longer than one nap time, but I did finish them in one day):


First I cut out paper numbers using my Cricut Expression and Mickey Font cartridge (This is one of my most favorite fonts!!)


Then I traced around them twice with a chalk pencil onto different colors of felt.

  • Make sure that you flip the number over once so that you can put the two drawn on sides together and not have any chalk showing. 
  • I also did the number in order starting from red going to purple, so that when we laid them in order they would make a rainbow. This is a good way to learn colors too, which we've already practiced with these. :) I love double learning!!

Then cut out the numbers (2 of each)


And easy-peasy quick and easy, line them up (I used pins to keep them lined up as I sewed) and sew them together using coordinating thread. For the lighter colors I simply used white thread to save time and you can't even tell. 


I debated stuffing them a little, but decided to leave them. I think I like them better flat.

(the flash reflecting off of them makes them look really weird in this photo. oh well.) 

Hunter does a really good job at stacking them nicely when we're ready to put them away. Now all I need is a bag to put them in. Or I thought of making a board or something to put on his wall so they can be hung up all the time.  We'll see what I get to. :)

We like these so much that I've already started on an alphabet, I just need to sew them now.

To hang them on the wall I thought of making a simple wall blanket but adding lines of velcro to keep them stuck on there. I haven't made it, but I think if we ever have an extra play room, I'll make one for there. :)


***************
If you would like to use the file I used to cut out the letters on my Cricut, you can find them here (http://dbbydesign.webs.com/svgfiles.htm). You will need to own Design Studio by Provocraft as well as the Mickey Mouse Font cartridge to be able to cut it out. I have the file for the numbers as well as the alphabet.

This site, dbbydesign.webs.com, will be where I upload any files (for patterns or cricut files) that I share. :) So check it out. :)


I'm linking up! So be sure to check out all the daily Linky Parties on my sidebar! -------->

Wednesday, January 19, 2011

Bloggity Blogs: Oh Fansson!

There are a lot of blogs out there that are super great, and a lot that come and go on my "Have to stay updated on" list. Oh Fransson! Is one that has always been on that list! If you don't know all the wonderful creations of Elizabeth Hartman, you HAVE to go check out...

Bloggity Blog: Oh Fransson!

She always has so many amazing projects, mostly quilting (and let me tell you, she definitely does NOT skimp of detail or quality!), 
Can you guess how many tiny squares she used to make this?! Isn't it beautiful?!

but sometimes there's something else thrown in there. 
LOVE these nesting bags! :)

I always love looking at her fabrics and wish that my overstuffed collection contained more of the fabrics that she has than what I have. :P Oh well. :) 

Aren't those the brightest colors?!

Her colors are wonderful!! And she has such a great eye! There is a lot that one can learn from her!

 I love everything about this mini quilt! The colors, the design, everything! It just makes me happy. :)


I am such a fan of these blocks! She has a few pillows and a tutorial on how she put these together.

Besides the great colors, I love the flowers she made to quilt it! She shows us how on her blog.


There are so many other great projects, quilts, quilt alongs and tutorials on her blog. You don't want to miss them!

Thank you Elizabeth for sharing your wonderful talent!! :)


Picture Links:

Monday, January 17, 2011

Made It: Children's Church Bag, Part 2

Two weeks ago I posted a tutorial on how I made my bags for my boys. (Which of course can be used for a million other things besides church bags. I've even used them already for bags when I didn't want to take everything in my purse. haha.)

But for the intended purpose, here are a few of the things I put in them for church, and a few fun ideas that I haven't put together yet. :) I have a LOT of links to some wonderful ideas, so I hope you have as much fun looking as I did. :)


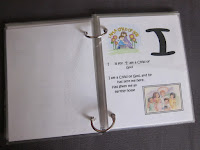
First of all, I printed out this cute ABC Church Book, from The Idea Door. It was super easy to cut and laminate with my YourStory machine. Then I just punched two holes in one side and used the  Loose Leaf  rings and here's a cute book. :


I think if I were to make one again I would change a couple of the pages to use different words, or maybe different descriptions, but this works and my boys like to look at it. :)


I also made a few manila folder activity folders that I found from this site well, I can't find it, but I know it's somewhere in the links at the bottom. I'll keep looking and update this when I find it. I like it because you can print them out black and white and color them yourself, or print them pre-colored, which I did and saved a LOT of time. :) How easy are these? Super. Print, laminate, cut, add velcro, tape to the folder, and your done! :)


After a bit of use I think I want to make these different too. I think if I can find more churchy stuff (like more bible oriented ones like Noah's Ark) than I would actually make a fabric book out of flannel. When the boys take the velcro off it's kind of loud, and I think if it were simply stuck to flannel it wouldn't be as loud. Plus they wouldn't have to match it up quite as exactly - which also means they'd have a little more freedom to play with them. Here's how I'd do it. Cut out flannel pieces that are two pages across. Trace the basic outlines onto the flannel and draw over them with a fabric marker. Then use crayon to color the pictures in and iron to set the color (I love that idea! so simple!). Make a fabric pocket on the facing page and label the activity. Sew the pages together and your done! :) (I think it would take a little bit more detail to make sure all the pages end up in the right places, but I think it would work pretty well.) The other thing with these books is that the pockets don't work very well. All of our Noah Ark animals are always falling through. It's impossible to keep the pocket taped on when you're always trying to reach in and get the pieces out. See...


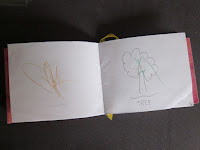
I also added a small handmade book for drawing. This was a practice book when I made all the books for the YW's last year - that's why it's pink and my boys are using it. :) On a couple of pages I drew some simple outline pictures for them to color. But mostly they just scribble right now.


That said, I also have some of these WONDERFUL Twistables Colored Pencils in there.
Crayola : Twistables Erasable Colored Pencils, 12 Assorted Colors/pack -:- Sold as 2 Packs of - 12 - / - Total of 24 Each
I love that they are washable/erasable, and if Jackson has a hold of them, we can just turn them down and I don't have to worry about him coloring on anything! I do really want to get the Mini Twistables Crayons though (I didn't know they had those when I bought these). Hunter likes to turn them out too far and then the tips break. I don't think I would have to worry about that with the crayons since they are SO thick!


I do also have another little book I put together. All it is are pictures of Jesus, and a few other pictures that are key to the Gospel, which I laminated, punched holes in and used the rings to hold together. I found these at the Church Distribution Center for very inexpensive, but I know you can also find some of them at Deseret Book. (Both places you can order online if you don't have one nearby).


I really like this, especially while we take the Sacrament, to help them know what we're supposed to be doing while everyone is being so super quiet. :) 


Ultimately we're trying to get away from bringing toys or fun stuff to church. We've decided that we want them to learn to be reverent and learn that it's important to be focused on what church is about. The husband is trying to get me to not bring anything, but I think a few things are alright. I think I might actually leave out some of the manilla folders that don't also teach, perhaps come up with some of my own stuff. But until then, here are a few more ideas and places you can go to find great ideas.


And of course when they get old enough to read, we'll add some scriptures in there too. :)

I really like this first book that is all about Jesus (or there is one that is on the Sacrament) - but my boys aren't old enough to read, so I think this will have to wait. (http://www.mormonchic.com/mommy/quiet_books.asp) Plus at this link there are more ideas, like the picture book that I made, a fabric quiet book that is pretty general (not churchy), and a photo book of your baby or family.


Links of all my bookmarks....

General Quiet Books:


Churchy Stuff (LDS and general Christian links):


The actual pdf files of ideas and things to download:


A few random links I had in my bookmarks that I know have some great stuff, but nothing specific in these links, just a lot more links:


If you have links to other websites or posts, or something of your own that you've made that fits here, leave it in the comments and I'll add it to my lists! :)

Thanks for stopping by! 
Linking up at these great parties ---> (check my sidebar for daily links)

Saturday, January 15, 2011

db By Design: Camera Pocket Pattern Giveaway


I've been working on a pattern of my Camera Pocket to add to my Etsy Shop. Besides the very few patterns I have done on my blog, I really don't have much experience with making patterns that are comprehensible by anyone but myself. (I make my own patterns all the time, but who know if they make any sense. lol)

I have taken a LOT of pictures, and have gone through the pattern multiple times and I think it's finished.

Before I start selling it, I want to make sure that it is not something that people are going to purchase and just end up being frustrated with. How to do that???

Giveaway is now closed. A Giveaway!! :)

Yup, I am going to give away TWO FREE patterns for TWO Awesome people to test out. 

Before I tell you how to enter, I want to make sure that you know that I am requiring specific feedback from you. That means you're actually going to have to try it. (And please do so sooner rather than later so I can make adjustments and get it added to my shop). If you don't want to give any feedback, please don't enter this one. ;) sorry. 

Here's how to enter:
First, follow my blog. If you are not a follower, I'll pick someone else.
Then leave 1 COMMENT with your name and a way to contact you, 
PLUS in the same comment, let me know what your favorite thing to take pictures of is.
(if you don't want to leave your email in the comments, you can email it to me at dbByDesign@gmail.com - but still leave a comment here and let me know.) :)

And that's it! :)

I will pick a winner in 1 week.
I will contact the winner to confirm an email address so I can send you a pdf pattern,
along with a short questionnaire.
Please try and get back to me (with the questions) within about a week or so.
Thanks!